Fundamentals of Drawing the Figure
This post will be an overview of the basics of life drawing from classes that I moderate and/or instruct. It is meant to clarify some of the technical terms and processes involved for newer students, and hopefully inspire others as well. I will use my own images, as well as other artists who have better illustrated what I am attempting to explain.
See a gallery of some figurative artists who inspire me here. I am updating this list, expanding the information on each artist, and compiling it in blog form on this site. I will be adding to it regularly.
If you are interested in viewing my own work, I am putting together a portfolio of my own life drawings here.
Contents:Gesture DrawingTechniquesLine of ActionBasic ConstructionChecklistMeasuringSimple MassingCross ContourMedian Line |
 |
What is Gesture Drawing?
We cannot begin a discussion of the basics of life drawing without first mentioning gesture drawing. Gestures are truly the foundation of figurative work. These quick sketches are usually done from poses no longer than two or three minutes, and often much shorter. They are meant to be exercises, and not finished drawings. Expect to do hundreds, or even thousands to improve your skill.
Gesture drawings are not representational drawings. Instead, they are loose sketches that capture the essential feeling, energy, movement, or action of a subject. They contain a minimum amount of information to achieve the essence of the pose. With our initial lines, we are trying to capture that sense of movement, without defining anything related to specific anatomy.
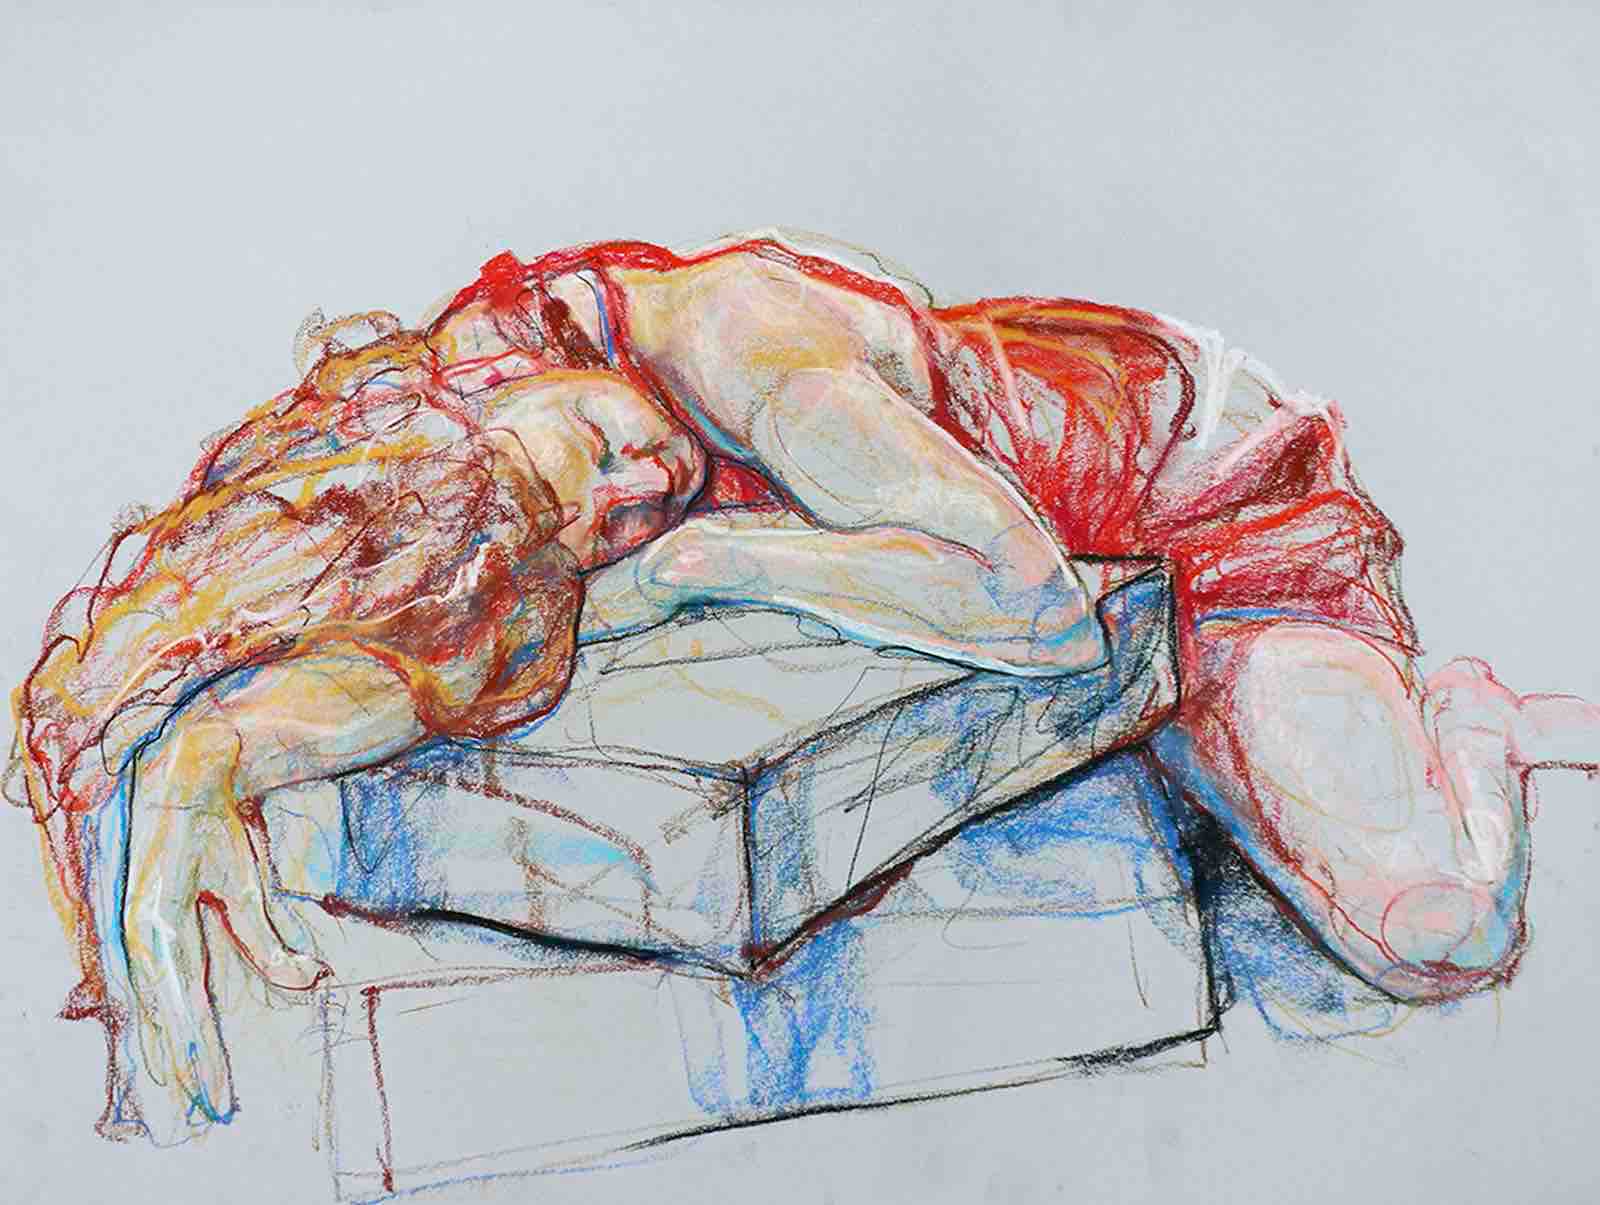
 Life Drawing - Kathryn Kaiser
 Kathryn Kaiser
 Don Gale Gesture Drawings
 Derek Overfield
 Alberto Giacometti Gesture
 Auguste Rodin
 Quick Pose Don Gale
 Katie Hellon Gesture Moving
 Derek Overfield
Basics of Life Drawing Techniques
Work on a fairly large surface. Newsprint pads are fairly reasonably priced, and it is possible to get five or ten gesture drawings on a 20” x 30” sheet of paper. It often takes some effort to break ourselves of the habit of years of writing and working on small surfaces using our hands, fingers and wrists. This becomes even more difficult to do when we are working on compact formats.
I always recommend beginning with charcoal or conté crayon as opposed to pencils. It keeps our strokes large and loose. No erasers please. If you are working with charcoal, just use a rag to wipe away any errors if you must.
Stand back from the drawing board, and draw with your arm and shoulder. Try to get out of the habit of holding the drawing tool the same way we do when we are writing. Master the overhand grip. This method will take some getting used to, but it keeps your movements smooth and prevents muscle exhaustion in your hand. D2 Impressive Techniques has a page on pencil holding here.

Make sure if you are standing, that you position your easel so that you have an unobstructed view of the model. If you are right handed, place your easel on the right side of your body at a slight angle to the subject. It is cumbersome to constantly be looking over your shoulder while you are working. Remember our gaze should be focussed on the model and/or subject, not our drawing board.
1. The Line of Action
The first mark made in most gesture drawings is the line of action. Basically, the line of action as a stroke that denotes the movement of your subject. It is usually located approximately along the line of the spine. It is an essential mark that conveys the extent and direction of the pose. Essentially this line is the basis of the development of your drawing.
The image shown is from Valerie L Winslow’s book Classic Human Anatomy in Motion. It is the essential companion to her bestselling first bookClassic Human Anatomy. See more on her website Valerie L Winslow here.
Note the varying ways the artists below have used line to lay down the basic Line of Action (or movement), and used this line to determine the placement and direction of movement of the model. I have chosen these images, because in many of the following examples, the artists have chosen a different colour and/or medium to depict the line of action.
 |
 |

2. Basic Construction
Remember you are still only capturing the ESSENCE of the pose. Don’t overthink it. Don’t focus on small details, or on outlining the body. These marks will still be light, gestural straight or curved lines. Again, stand (or sit) back from your paper, and use your whole arm. Make long light strokes to place your image on the page. Where is the tension? Perhaps do the pose yourself.
 |
 |
Checklist for Drawing Progression
- Build on the Line of Action. Construct your drawing with simple basic shapes.
- Don’t think in ‘body parts’. It is best to try to think of your model as basic shapes, lines and tone. We all have preconcieved images of the human form that gets in the way of us actually seeing the model.
- Draw the head as a simple shape, or better yet, just denote it’s location with one or two lines. Then mark the centre line and the eye line. Don’t focus on the face at this point. These marks are mainly to denote the placement and angle of the head.
- Lightly draw the centre line of the body, through sternum, navel and down to groin. This line will be approximately where the spine is, and often (but not always) follows or runs parallel to, the line of action.
- Place the shoulder lines at the collar bone. These can either be straight or slightly curved.
- Mark the hip lines at (approximately) the top of the pelvic bone.
- Check the angles of the shoulders and hips. Most often shoulders and hips are tipped in opposite directions.
- Place the legs from hip, paying attention to lengths and angles, with basic shapes (or lines) for feet.
- Make the arm lines from the shoulders with simple shapes (triangle) for the hands.
 Harry Carmean basic “stick figure” construction drawn in blue
 Valerie L. Winslow
 Jeff Mellem first marks
 Axis and Hip Lines - Human Anatomy In Motion - Valerie Winslow
 Axis and Hip Lines - Human Anatomy In Motion - Valerie Winslow
- Harry Carmean basic construction drawn in ochre
- Basic construction marks visible in this Auguste Rodin sketch
3. Measuring Lengths and Angles
Before we get too far into our drawing, it is prudent to check to make sure the basic proportions and placement are well underway. Obviously the length of the pose will determine how much time we can spend examining our measurements.
When time allows, you might use a pencil for measuring relative lengths and angles. Hold your pencil up to the model, and use it to determine how long the forearm is compared to the torso, or how long the lower leg is compared to the upper leg. You might use the head as the relative unit. In other words, how many times does the head go into the torso, or the leg?
Once again, I would encourage you to try to step away from the model as a human form, and see them as a series of shapes and lines.
 How much of each side of the model lands on either side of a plumb line drawn from the ear down?
 Use a guide to determine the angles of the limbs
 Use horizontal lines (and angle measurements) to help with foreshortening
 Use horizontal lines to measure placement
Human perception of the body is so acute and knowledgeable that the smallest hint of a body can trigger recognition.
Jenny Saville
4. Simple Massing
Once we have the basic proportions of your model lightly mapped out, begin adding some mass. Often the large body parts such as the torso and the legs are first laid in with very simplified, general shape. Again, we are not focussing on every anatomical detail, but only simple shapes.
Up to now you have been using fairly light pressure in your mark making. You can start to get a bit more bold at this stage. Play with some varying line weights and widths.
Artist Terry Miura explains basic massing this way: “It may be helpful to think as a sculptor might — these simple masses are lumps of clay before you start carving out the specific parts. As with sculpture, you can imagine that these lumps of clay are attached to a wire armature, which, not coincidentally, are the initial gesture lines that we’ve already established.”
- Harry Carmean massing over ‘armature’ drawn in yellow.
 Terry Miura Gestures
 Terry Miura Charcoal
 Alex Wong Gesture Drawg
 Massing done with contour lines. - Kathryn Kaiser
 Massing done with contour lines and line weights. - Kathryn Kaiser
 Massing done with contour lines and line weight. - Kathryn Kaiser
5. Cross Contour Lines
As we begin filling in the volume of the figure, one of the techniques that helps us in visualizing the form is cross contour. Cross-contour lines travel across and around the form and describe the volume of your subject. We are still not focussing on outlining our drawing, such as we would be doing in traditional contour drawing. We are looking for the lines within the figure (or other subject).

a. Topographical Median Line
One of the first cross contour lines I will make when I get to this stage is the median (or centre) line. This centre line is not the same as the initial gesture line, nor does it go through the core of the torso mass. This is the line that runs down the centre of the front and the back of the torso on the surface as a contour line would.
The median line describes the orientation of the torso and enables us to illustrate the twist of the torso and the angle of the model. Take your time drawing the median line, as it is an indespensible guide for the artist. Be mindful of how much of the torso is showing on either side of this line. Keep in mind we want to try to correct our drawings so that they are symmetrical, and both sides of the torso are rendered as the same size. This rarely occurs in your model.
 Terry Miura - Even in a somewhat more finished drawing, the median line is still visible.
 Terry Miura - Note in the figures on the left and right, how little of the torso is actually visible.
 Jylian Gustlin
 Derek Overfield - Centre line is very close to right side of the model
 Brian Smith - Centre line visible on a finished piece.
- Kathryn Kaiser - Median line of the spine.
 Michael Reedy - In this drawing both the median line and the original line of action are visible, and follow each other quite closely.
b. Cross Contour Drawing
Cross contour drawing is a wonderful way to begin to understand the volume of your subject, and it is an especially useful technique in drawings where we are depicting foreshortening. The more foreshortened the leg, the deeper the arc of the cross-contour line.
 Cross Contour Apple
 Aaron Earley Cross Contour
 Michelle Morris Cross Contour
 Cross Contour
 Kathryn Kaiser - Cross Contour Exercise
 Kathryn Kaiser - Cross Contour in Gesture Dwg
 Henry Moore
 Woman Seated in the Underground - Henry Moore